Monday 30 November 2015

Some thoughts on the beehive helmet

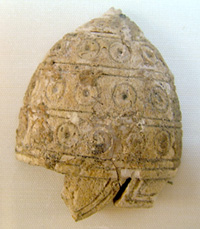
I want to make a beehive helmet, like the one shown in this ivory relief from Phaistos.  It's basically the same thing as the famous boars' tusk helmet featured in the Iliad,  but with what appear to be metal studs instead of tusks.  Metal studs may have been a cheaper alternative and were a popular choice right up until the end of the Bronze Age.

Picture from the Salimbeti website

Various forms of beehive helmet are depicted in Greek art from the Neolithic through to the end of the Bronze Age, but they all have that distinctive conical shape and in most cases seem to have been made from leather or linen, although metal versions did exist (and in some cases they continued to be used in the Classical period).

I'm reluctant to compare the beehive helmet to a modern military helmet, because it was designed for a different purpose.  The beehive helmet didn't have to stop bullets, because in 1600 BCE bullets didn't exist yet.  It had to protect the wearer from arrows and sword blows, as well as maces and stones fired from slingshots.  Slingshots were not uncommon on ancient battlefields in Europe and the Near East because they were cheap, and they could be very effective too.

This meant the beehive helmet had to be resistant to cutting or piercing, and it also had to protect the wearer from blunt force trauma.  It would have been very important to use designs and materials that could absorb and dissipate the kinetic energy from an impact.  In this respect I think the beehive helmet would have worked rather like a motorcycle helmet.

Let's take a look at a motorcycle helmet:

Image found here.
The helmet has a hard outer shell which may be made from thermoplastic, kevlar, or carbon fiber.  Inside the shell, there is a thick layer of styrofoam, which dissipates the energy of an impact.  This is the part that prevents head injury.  Next comes a layer of soft foam to help the helmet sit comfortably on the rider's head.  These days some military helmets also have foam inside them to absorb impacts.

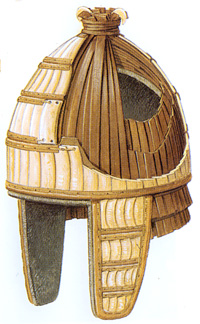
Homer gives us a little bit of information on how boars’ tusk helmets were made, and I think this information can be used as a starting point for reconstructing the Phaistos helmet.  In book 10 of the Iliad Homer describes the boar’s tusk helmet which Meriones gave to Odysseus:

"On the inside there was a strong lining on interwoven straps, onto which a felt cap had been sewn in. The outside was cleverly adorned all around with rows of white tusks from a shiny-toothed boar, the tusks running in alternate directions in each row."

This is a cross section of the helmet Homer described:

Picture from http://www.salimbeti.com/micenei/helmets2.htm

In terms of function, this is quite similar to the motorcycle helmet.  The boars' tusks correspond to the hard outer shell of the motorcycle helmet, while the leather core would absorb impacts.  The felt lining made it more comfortable to wear.  Boars' tusk helmets, by the way, weren't exclusive to Greece.  They've been found as far afield as Serbia.

The ivory helmet from Phaistos dates to the 16th century BCE and is therefore roughly contemporaneous with many depictions of boars' tusk helmets, so it seems feasible that it would be constructed in more or less the same way.  I'm going to explore that hypothesis, and try to reconstruct the Phaistos helmet using leather.


Tuesday 24 November 2015

A small project for November

This month's HSM challenge is Silver Screen - make something inspired by a costume from a movie or TV show.  My original plan for this challenge was to make an Egyptian bead dress (a historicized version of a costume Theda Bara wore in Cleopatra), but in order to get that done in time for the deadline I would have to have started sometime around July.  I didn't.  So I've had to scale back my ambitions and find a less time-consuming project.

The idea of taking something blatantly, egregiously unhistorical and turning it into something actually attested in the archaeological record really appeals to me, and that was always what I wanted to do for this challenge, but as I say I ran out of time.  Then one day I was flicking through my copy of The Viking Way while I waited for some code to compile, and I came across the Hedeby masks.  And I remembered that episode of Vikings, where the French emperor Charles and his daughter Gisla have those outstandingly unhistorical masks.

Vikings gets a lot of flak generally for its historical inaccuracy, and for good reasons.  I understand the process and the considerations involved, but I find Vikings hard to watch because it departs so far from reality.  As far as those masks go I'm not aware of any historical reality behind them and I have no idea why the writers chose to give the characters masks*, but the vikings did have masks and I thought a historically accurate viking era mask would be a fun little thing to make.  As always with Vikings, the reality is much more interesting, and much stranger, than the TV show.  In reality, viking masks looked more like this:


Reconstruction of a 10th century viking mask made from felt.


This mask is based on a 10th century one from Hedeby.  The original appears to represent a sheep and I tried to make mine look like a sheep too, but I should probably point out here that we do not know for sure the Hedeby mask was meant to be a sheep.  It's a bit ragged now and may have been bent a bit out of shape, but it certainly looks like a sheep.  Here is the original Hedeby mask:


From page 172 of The Viking Way by Neil Price.

The masks found at Hedeby were probably used in rituals relating to the god Odin.  It's a standing joke in archaeological circles that any object whose purpose isn't immediately apparent must be a ritual artifact, but in this case we can be reasonably confident the masks were associated with worship of Odin.  There's a good discussion of this in The Viking Way, and we actually have a 10th century description from Constantine VII of a dance that involved animal skins and masks.

The original Hedeby mask has a fuzzy nap, made by brushing the surface of the felt with some kind of a stiff brush.  My version also has a nap made by brushing the felt surface in the direction the sheep's fur should go.


The Challenge: Silver Screen.

Fabric: A piece of felt 25 cm by 25 cm, which I made from the wool I had left over from my Borum Eshøj belt.  It's easy enough to make felt from yarn if the yarn is thick and made from real wool; you simply un-spin the yarn and felt the resulting strips of un-spun fiber.

Pattern: The Viking Answer Lady provides a gridded diagram of the Hedeby sheep mask.  I played around with it to make a pattern that takes into account the shape of the surviving fabric and is bilaterally symmetrical, as the mask would have been originally.

Year: Somewhere around the 10th century.

Notions: Linen thread to sew up the nose and help shape the head.

How historically accurate is it?  I think it's very accurate.  Maybe even 90% as the pattern is directly based on a 10th century artifact.  The felt I made is wool, but it may not be exactly like wool used in the viking age.  I'm not sure about that.

I made the felt with soap and a sushi mat, which of course isn't the authentic viking way.  I don't know how they made felt, but I do know how cloth was fulled in the middle ages and I therefore suspect the felting process involved urine.  There's a limit to how far I'm prepared to go in the pursuit of historical accuracy.

Hours to complete: Two, including making the felt and messing around with the pattern.

First worn:  I tried to take some photos of me wearing the mask, but this was not a success as it turns out the eye holes on the original aren't quite in the right place for me to see out of them.

Total cost:  Effectively $0 since the wool was left over from a previous project.  This piece of felt would have used a couple of dollars' worth at most.


*If this was Fargo or perhaps Game of Thrones I would be inclined to think the masks had a symbolic significance, but Vikings is not that clever.

Thursday 19 November 2015

Brocaded tablet weaving pattern

Here are the patterns for the strip of brocaded tablet weaving I made recently.  Feel free to use them however you like.  Note that these are brocade patterns; they don't have anything to do with the way the tablets are threaded and could be used for any type of brocade.  My ground weave was just a plain four-hole structure with all the holes threaded in the same colour, which is how the original from Birka was made.

This interlace design is copied from band 2 from Birka grave 824.


The numbers refer to tablets.  By way of a recap, here's what the pattern looks like made up:


This is the pattern for the rune design:


As before, the numbers along the top indicate tablets, but this is a brocade pattern.  It doesn't show how tablets should be threaded.  Each row corresponds to a shed - i.e. a quarter turn of the tablets.

Tuesday 17 November 2015

Farmhouse ale

Saturday was brew day at my house.  I made some farmhouse ale like great-times-many grandma used to make.  Farmhouse ale is also known as raw ale, and the defining characteristic is that it's made without boiling the wort.  This is how most beer was made up until recently, because in the past people didn't have access to metal containers large enough to boil their wort.

My first ever batch of farmhouse ale

As an aside, you may have noticed there's no airlock on that container.  When I made mead I found I didn't really need one.  The container's cap is screwed in place loosely, which allows the carbon dioxide to escape and prevents contaminants from getting in.  That's what an airlock does, plus it lets the brewer see whether fermentation is taking place.  I know whether fermentation is taking place because I can hear it bubbling when I put my ear next to the cap.

Anyway, back to the ale.  I discovered the concept of raw ale when I found Lars Marius' excellent blog, and decided I would like to try some.  Apparently it is very different to beer made with boiled wort, but in a good way.  This seems to be because the protein from the barley, which is normally destroyed by boiling, remains in the beer.  Farmhouse ale, therefore, is a source of protein and more nutritious than your typical modern ale.  The downside is that leaving the protein in the beer reduces its shelf life, but if it tastes good this will not be a problem.

The process for making farmhouse ale is a fairly simple one, as summarized in the following diagram:


Diagram from Larsblog

I used a simple infusion mash - I just added hot water to crushed grain, and left it for 90 minutes with towels wrapped around the pot to keep the temperature stable (thanks to Chris Colby at Brew Your Own for that helpful suggestion).  My hops were boiled for 60 minutes.

The amount of grain per liter of recipe yield seems to vary a lot, but based on things I've read online I've assumed between 0.25 to 0.6 kilos of grain per liter of beer.   I've got about 9 liters of beer using 3 kilos of grain.  Here are the ingredients I used:

  • 3 kilos of mild ale malt
  • Half a pack of Styrian Goldings hop pellets
  • Half a pack of Mangrove Jack brand Belgian ale yeast
  • A pinch of coriander seeds.  I like coriander in my beer.


Things I have learned so far:

  • Brewers' World in Lower Hutt is awesome.
  • I need a bigger mashing receptacle.  Anyone got a chilly bin or boil-up pot they don't want anymore?
  • According to some of the posts on Larsblog raw ale can be an acquired taste, and I can believe that.  It looks like the ale will be quite thick and have a lot of body to it, which doesn't really surprise me given its protein content, and if you normally drink commercially produced lagers this stuff probably would be very different from what you're used to. 
  • Hop pellets totally look like a pot of boiling pond scum when they are being cooked.


See what I mean?

But will my ale be any good?  I have no idea and will just have to wait and see.  What I do know is that at $15.80 for 9 liters, if this is even vaguely drinkable it will be good value for money.  It's just about finished its primary fermentation now, and so far its colour and smell are not unlike Funk Estate's Berliner Weisse.  Hopefully that's an indication of the flavour.

Sunday 1 November 2015

My October project

I've been looking forward to October's HSM challenge, but October hasn't been a good month for me and I've only just got the project completed.  October's challenge is Sewing Secrets:

"Hide something in your sewing, whether it is an almost invisible mend, a secret pocket, a false fastening or front, or a concealed message (such as a political or moral allegiance)."


The brocaded tablet woven bands from Birka were between 6 and 15 mm wide, my version is about 13 mm.

This is an adaptation of a brocaded tablet woven band from Birka.  What are its secrets?  For starters green and gold are the colours of my alma mater, Victoria University of Wellington.  The pattern also includes a runic cipher, a kind of magic inscription meant to bring good luck.  For this challenge, I wanted to explore the concepts of runic codes, and magic in viking age textiles.  In the viking world there was a strong association between textiles and magic, and their literature contains plenty of references to textiles with magical properties.

This diagram shows the rune symbol I used and how it works.  It combines the letters G and A, which are the initials for gibu áuja, or "good luck" in Old Norse.  I wove the runes in groups of four in a decorative pattern.


I chose this symbol mostly because it's very easy to work it into the kind of pattern we see a lot in Norse tablet weaving.  Norse tablet weaving designs used geometric patterns composed of straight lines and 45 degree angles, which is the type of design tablet weaving is naturally inclined to produce.

Magic and religion in the ancient world interest me, because to understand what these concepts meant to the people who believed in them we have to think about how they viewed the world.  Our ancestors weren't stupid or gullible, but they did have a worldview that is in some ways quite alien to us.  We think of the supernatural as something separate from the natural world, but to people in pre-industrial cultures it was just another aspect of the natural world*.

The word "rune" means a secret or mystery, so runes are certainly an appropriate subject for this challenge.  They were often written in code or using ciphers that combine more than one letter.  Sometimes inscriptions that make no sense at first glance are encrypted, or are magical formulae, but not all runic inscriptions were magical.  Many were written for very mundane reasons and sometimes the runes were encrypted just for fun.  This runic code from Bergen is too good not to share!  The men’s beards contain a coded message.  The beards indicate each letter's position in the alphabet, so for example the third beard from left is th, and the next one is á.

Photo: Aslak Liestøl, Museum of Cultural History, University of Oslo


Anyway, we’re getting a bit off track.  My project is, shall we say, speculative.  I'm not aware of any Viking textiles with runes woven into them.   As a technique, tablet weaving lends itself well to incorporating complex designs like lettering, and there are some examples of Anglo-Saxon tablet weaving incorporating writing in the early medieval period.  I'm referring here to the cingulum of Bishop Witgarius and St Cuthbert's maniple.  The inscriptions on these items aren't actually spiritual; they record the names of the women who made and donated the garments.  This use of text to secure bragging rights is common in viking runic inscriptions too, but of course just because Anglo-Saxons did it doesn't mean Scandinavians did it and my runes aren't a signature.

There doesn't seem to be any reason why textiles with runes couldn't exist, but with no hard evidence to go on it definitely falls into the "you can't prove they didn't" category.  That said, runic inscriptions have been found on a wide variety of viking objects, so I say why not?

The Challenge: Sewing Secrets.

Fabric: About 30 cm of brocaded tablet woven band.

Pattern: My own, based on a design from Birka.

Year: If it were at all historically accurate I think it would be early viking age, since the runes are an older style of writing.

Notions: I couldn't afford to use real silk and gold like the Birka bands, so I used synthetic gold thread and mercerized cotton.  To me mercerized cotton looks more like silk than viscose thread, which is unnaturally shiny and has a synthetic look that I don't particularly like.

How historically accurate is it?  Um.  As I've discussed above it's a fun concept, but can't actually be documented for the period.  And the materials aren't accurate either, so maybe 25% at best.

Hours to complete: Not sure sorry.  I've been doing a bit here and a bit there since August and lost count.

First worn:  N/A.

Total cost:  I already had the imitation gold thread, and I seem to remember I paid about $5 for the ball of crochet cotton.


*If you want a good, intellectually-satisfying-but-also-entertaining discussion of why our ancestors believed some of the things they did, I recommend the Tony Robinson series Gods and Monsters.  For an in-depth discussion of magic in the Viking age, try Dr Neil Price's The Viking Way.  Hard to get hold of unfortunately, but worth the effort.  For a really detailed look at rune magic I suggest Stephen Flowers' doctoral dissertation Runes and Magic.